
from Shutter, by Lewis Collard
I have loved Darktable for nine years now! I've been using it since version 1.0.4 (in the Year of our Lord 2012), which is when I first wrote the page you are reading. I'm rewriting it in late 2021, and I am using version 3.8.0.
Over the years, it has gone from a merely excellent piece of free software to an outstanding one. As I'm rewriting this, I've had to wipe out several screenfuls of complaints I used to have about it! It is the finest raw processing software anywhere in Linux-land.
I'm running Darktable on an i5-3350P junk desktop from hell with 8 gigabytes of RAM. It works just fine. The only absolute requirement is that your processor supports SSE2 instructions, which is any processor that any sensible person today would be using - or, indeed, even junky 2013 processors like mine which were far from top-of-the-range when new.
Of course, the more RAM and processor horsepower you have, the better.
If your graphics card supports OpenCL, you will get GPU acceleration of Darktable's modules. My junk desktop's graphics card is a NVIDIA GT 710, an entry-level card from 2014, which doesn't support OpenCL as far as I know. Oh well, it still performs well enough without GPU acceleration, but I suspect it really screams with it.
It allegedly works on Windows and on Macs. I haven't tried Darktable on either of these systems, but it probably does not work as well on those systems as it does on Linux, because GTK+ applications rarely do.
Darktable should support raw files from just about every camera, from 1999's Nikon D1 on up. As with commercial software, it won't necessarily support it with the very latest cameras until Darktable has had a chance to catch up, unless your camera supports DNG. Blame the camera manufacturers for their silly protectionism, not Darktable.
"Enhanced support", which is to say with custom colour matrices to match the colour rendition of the camera, might not exist for your camera, or they might not. Don't worry about the enhanced support too much; just play with the colour until you get the results you want. If you wanted it to look like the camera thinks it should, you'd be shooting JPEGs! See "How does it look" below; this is why you're shooting raw.
Darktable is very well-behaved. It doesn't insist that you use it to import and manage your entire photo library. It fits just fine into your current workflow, which is very important to me; it'll happily work on a single folder, or even on a single photograph.
This is good on two counts. First, it makes it much easier and faster to get started with it (a big deal for those of us with tens or hundreds of thousands of photographs). Secondly, some of us (me) are stuck in our ways when it comes to our methods of organisation and our workflow, and we (I) don't like it when software wants to manage all of it.
Better yet, when you import images into Darktable's library it leaves those images in place, rather than making a copy of it. It then keeps a log of the changes you have made in a text file in the same directory as the image. This means that when you move your archives from one machine to another (or from one drive to another, as I did a few days before rewriting this article), you can open up one of your raw files and it'll pick up where you left off!
I like all this very much.
Darktable preserves all significant Exif data when exporting to JPEG. It adds a few of its own.
Lesser raw processors, including several commercial ones, throw away Exif fields which they don't care about (like the number of shutter actuations on Nikon cameras). That's naughty!
For those that really really care, I've done a fuller analysis of it on a separate page.
Darktable is very reliable. It used to crash when trying to read files from a Nikon D1 from 1999. That's a very niche case, and the only time Darktable has ever misbehaved with me! And that bug was fixed forever ago.
I wish all software was like this, and a world in which I didn't have to mention this as if it was a feature would be a better one, but that's where we are.
The documentation is very comprehensive, but it works best as a reference, not a tutorial. It will not help you much if you are not already familiar with image editing in general. It is also not very well arranged; it introduces technical details of how its processing pipeline works before teaching you how to actually do anything.
There's an easy opportunity for a collection of "how do I..." tutorials here.
Super! Darktable has all the tools necessary to make files from really old, crappy cameras (all of mine) look fantastic with careful processing.
With that said, in my experience from the various junk cameras I own, your photos will always look worse at Darktable's default settings than JPEGs straight from the camera, if you've not done something silly like shooting with the wrong white balance. Don't expect to throw them into Darktable and even have a good starting point; that is not what Darktable is for.
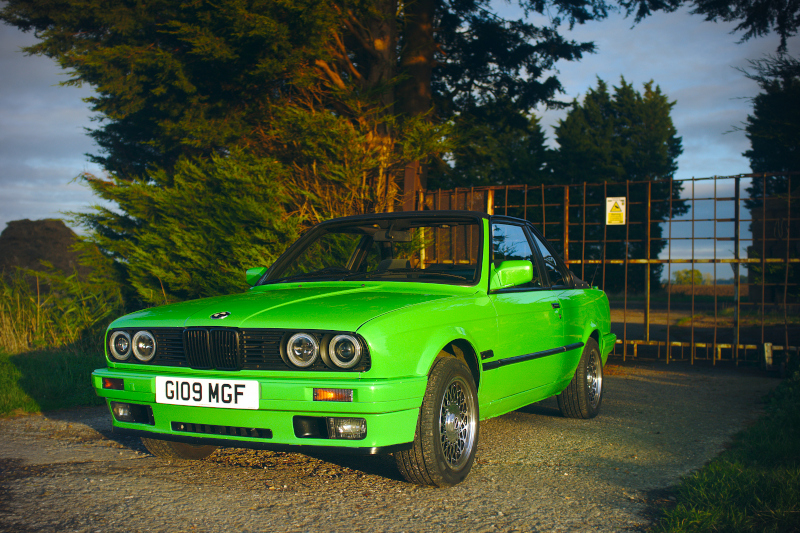
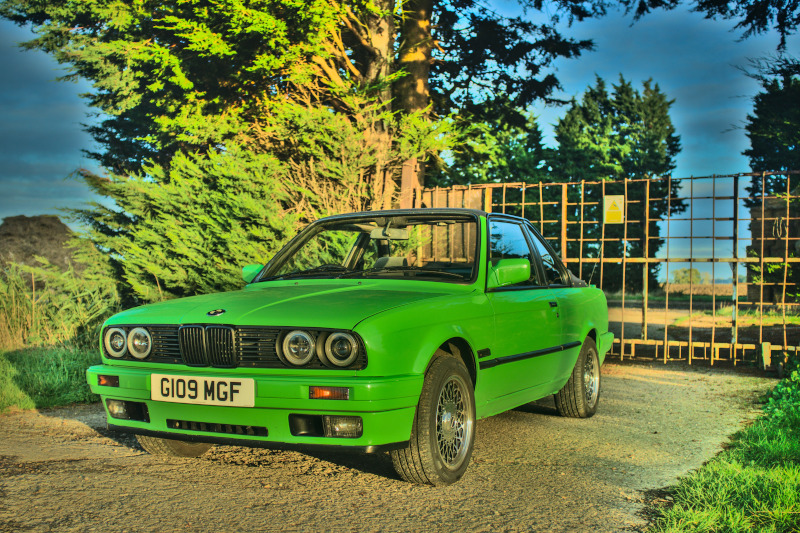
I could pick any photo from this page to demonstrate this, but let's use my brother's very green BMW E30. Here is the JPEG straight from my X100:
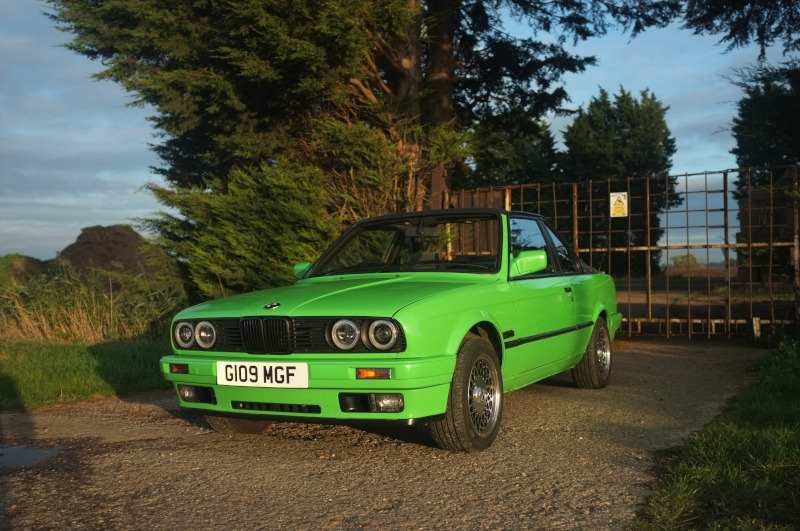
Here it is in Darktable at all its default settings:
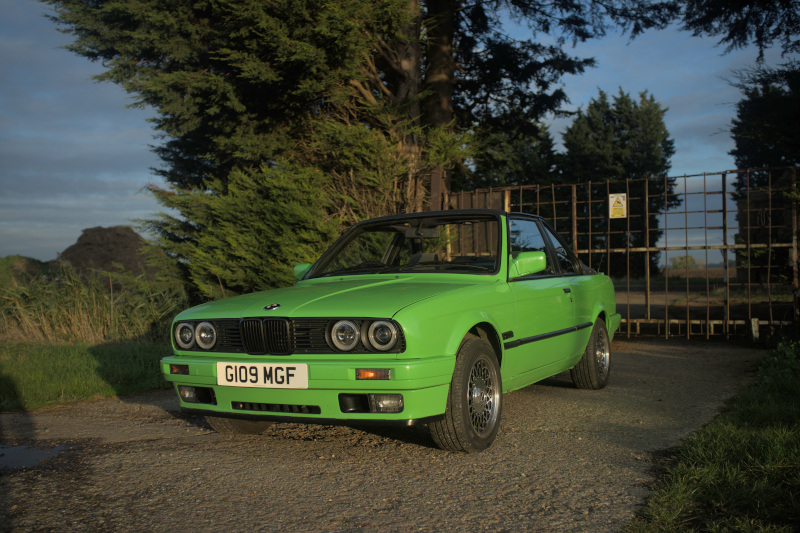
Darktable's default settings look worse than the JPEG to me. That is merely my opinion, and that really means looks worse, for a still photograph of a vividly-coloured subject. For other subjects, who knows? Darktable could look better at its default settings for what you shoot.
This isn't a criticism of Darktable. It's to give you an idea of what to expect; for fast results, just get your settings correct in-camera and use the JPEGs. Most people shoot raw because they like spending a while messing with files to get just the right look. It's fun!
Here's how the same raw file looks after about ten minutes of work in Darktable:
Think you can do better? Of course you can; I'm just one idiot with a website! Download the raw file and play with it yourself! (No rights reserved; if you do an epic edit of that file you deserve to do what you want with it.)
The interface makes sense, most of the time.
All text in the interface is in lower case. I think this makes it less readable.
I can only complain that the UI changes from time to time! The 1.x series was almost perfect as it was, and I got very used to it. Then it changed, for reasons. For example, it used to have a standalone "vibrance" module, which was simple to use and did the right thing most of the time with a single slider. That is now tangled with a bunch of other settings in the "color balance rgb" (sic) module, which is harder to find.
It used to group modules as "basic", "tone", "colour" and "effects". It later regrouped them into "technical", "grading" and "effects". I am not sure this was an improvement, and if a change to a UI is not a self-evident improvement it should be avoided!
None of the UI changes have been as disruptive to me as, e.g., GIMP's changes to their slider widgets. I complained about Darktable's changes to myself for about 5 minutes, then got over it.
The scrollbar next to the list of modules is very small. It is separated by only a pixel or two from the button that collapses the module sidebar. I click the collapser by accident all the time while aiming for the scrollbar.
The context menus don't necessarily behave as they would in every other application. For example, if you right click in the curve in the "tone curve" module and use the right mouse button to select a preset from the context menu, it will create an extra tone curve module on top of whatever one you have active, rather than changing the preset of the current one. In every other program I have used, right-clicking on an item in a context menu is no different to left-clicking.
Here's some assorted observations from using some of Darktable's modules. (I wish they had a better name than "modules", because that seems to describe their technical implementation; I will occasionally refer to "filters" on this page.)
The monochrome filter widget is wonderfully simple; click on a colour to emulate a coloured filter of that kind. This is much much faster than adjusting channel mixer sliders.
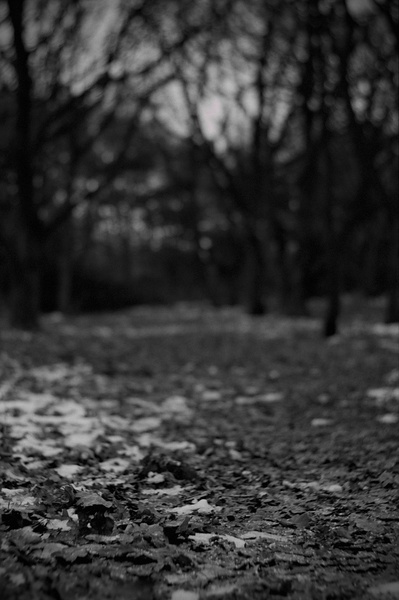
Autumn path,
shot with a prehistoric
Canon EOS D30,
raw file processed with Darktable.
Grain is very well done. When combined with the monochrome filter it could easily pass for actually being shot on black-and-white film.
Don't use "Rotation" if you want to rotate an image by 90 degrees (like when your camera mis-guesses the orientation in which it was held). Use the "Orientation" module instead.
Darktable's perspective correction is magic! It automatically finds lines in your image that should be horizontal or vertical (you can choose whether to do either or both), and corrects them, all in a click or two.
By default, Darktable does not crop away the empty space created by perspective correction. You need to set the "Automatic cropping" dropdown to make this happen. While one might think that this should be on by default, there's more than one way to do this cropping, neither of which is objectively more correct.
This is probably most useful to people photographing tall buildings, but works on almost anything you care to throw at it.
Here's a nice bit of British Rail signage I found on my wanderings:
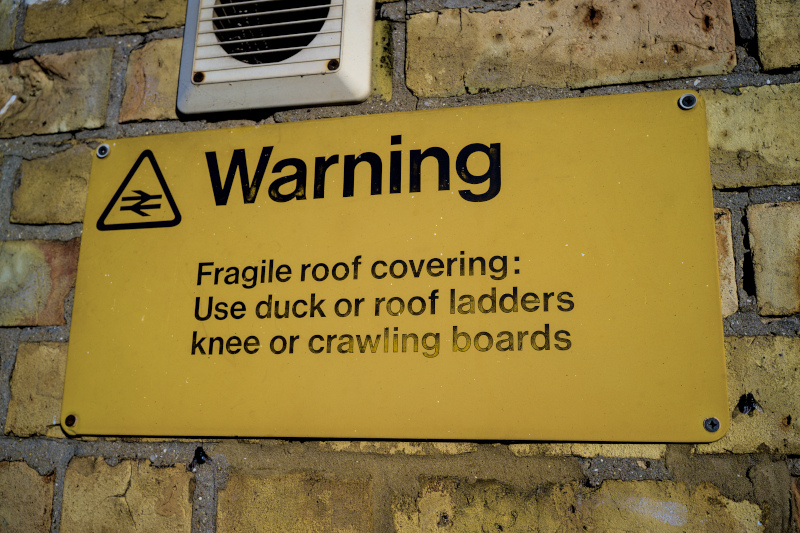
Because of where the sign is, and where I had to stand, I had to take this photograph slightly to a side and pointing slightly upwards. With a couple of clicks in Darktable you get this:
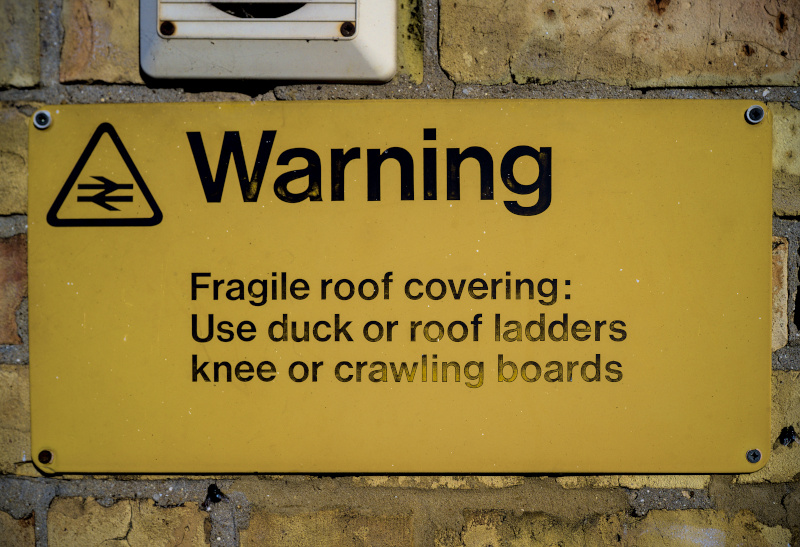
Awesome!
Vignetting can look very natural, because it has an option to control the saturation of your vignette. Fake vignetting often looks bad because it's just a black-at-reduced-opacity overlay, which causes the vignetted area to head towards grey, rather than a darker version of the same colours. Set "Saturation" to "0" in the vignetting filter in Darktable; it will look much more natural.
Because I like overkill, there is a separate page on Darktable's vignetting with samples.
This tool is the easiest way to make your photos look bad. That's not Darktable's fault; it's your fault if you over-do it.
This can be used to pull back detail from overly-dark shadows and overly-bright highlights. In practice, people crank these to 11 to make their photos look like bad HDR. Darktable should implement micropayments for this tool and charge per notch on the slider; it'd create an disincentive for you over-using it.
Whatever you think looks right to you after tweaking it for a while, reduce the effect a little after that. Or take a short break then compare it to the original with fresh eyes to see if you have actually improved your photo.
If you like your shadows dark, Darktable's shadows and highlights tool can work in reverse. You can set negative values for "Shadows" to push shadows down, for example. This is sometimes much faster than tweaking curves.
If Darktable has support for your camera specifically, it will only give you the white balance presets that your camera supports. For example, my X100 has a single "Shade" setting for both overcast lighting and actual shade, so Darktable has a single "Shade" setting for RAF files from that camera. My Nikon cameras have both a "cloud" and "shade" setting, so Darktable has settings for both.
In older versions of Darktable, this meant that files from some really old weird cameras lacked all white balance presets (having only camera, spot and passthrough). I can't remember what cameras these were, and for all I know they've probably fixed those now. Still, there's some chance that Darktable will only give you limited white balance options if you're using either a very new or a very old and weird camera.
The colour correction module is really easy to use! Unfortunately, it is applied before the monochrome module, which means you can't use the colour correction module to split-tone a black-and-white image.
I wish the dedicated split-toning module was as straightforward to use as the colour correction module. There's no reason the interfaces should be different, because they do almost exactly the same thing. Maybe if the split-toning module had the same interface, I would be able to get it to do something useful; I can't work out how to make it affect anything but the shadows.
Because Darktable will happily work on JPEGs as well as raw files, you can use the colour correction module for split-toning if you export the monochrome image as a JPEG then load the JPEG into Darktable. Of course, you'll want to do all the other adjustments before the first export-to-JPEG.

Noise reduction ("raw denoise") works well enough. I've never got it to look as good as the denoising algorithms built into my cameras. However I tweak it, I cannot find the right balance between reducing obvious hotspots and killing all texture in the photo. Use it if you really must; on modern cameras (and even some of my old junk) high ISOs are so clean that you're not going to notice noise at sensible enlargements.

This is on by default. You want to leave it on. You won't notice it most of the time, but if you turn it off you will be bitten in high-contrast lighting.
There is a separate page about this.
With certain cameras, Darktable can do tethered shooting, wherein you attach your computer to your camera, and control your camera from your computer.
It can also read files directly from your camera. I prefer to use a £5 card reader instead. With the old junk cameras I use, transfers are much faster with a card reader.
I don't use either of these, but they could save you some time if you work in a studio.
If you use Darktable on Christmas Day the Darktable logo gets a Santa hat. It's adorable!
Try it. If you don't like it you get your money back.
As for me, I love it! Darktable is probably the best raw converter there is for Linux, and undoubtedly the best in open source. I've picked on it a bit because some stuff bugs me, but bear in mind I could use commercial software and find stuff that bugs me about it too.